Collection of your Design A Shed product (Monday to Friday 9 am to 4:30 pm)
All of the products that you purchase through us can be collected from our Fairfield factory outlet at no charge.
Most of our Cubby and pet house products will fit onto a standard 6x4ft trailer (no cage - no bar) or bigger. We will forklift the item onto the trailer for you and you will need to supply rope (not occy straps) to tie it down securely. If you are purchasing a shed or large cubby with elevation kit and slides, please check with us for the dimensions and discuss appropriate transport. Usually either a tray truck or tandem car trailer will be satisfactory.


These are examples of cubbies flat packed and ready to load.Note the floor of the cubby doubles up as a 'pallet'
Please note that we do not have storage facilities. Purchases must be collected within 7 days of completion.
A $15.00 per day storage fee will apply thereafter. We thank you for your understanding.
Delivery of your Design A Shed structure:
Melbourne Metro Deliveries: From $190 (door-to-door) (depending on suburb) ($290 for sheds)
Interstate:
All of our deliveries are made with reputable freight carrier.You are quite welcome to obtain your own quotes from a local transport operator, we can supply you with the package dimensions. We will work with your freight people happily.
Freight rates: Feel free to contact us to get an accurate rate as structure size will impact the freight.
Special requirements regarding Melbourne Metropolitan Delivery:
It is important to realise that, in most instances, you will be receiving a very large item, usually in excess of 200kgs. Thus to accept delivery of your product you will need at least 2 people capable of hand unloading it from the delivery van. In most cases the driver will be quite happy to assist but they do reserve the right to refuse to hand unload due to Occupational Health and Safety Concerns.
Deliveries will normally be made during business hours only.
Important. Interstate deliveries:
Before you accept delivery and sign the receipt docket, please ensure that there has been no damage sustained during transit. If, in the unlikely event that your product has been severely damaged by the carrier, then we ask that you do not accept the delivery. It helps us to be able to fix the damage and resend the structure at no additional cost to you or us if the carrier is held responsible. However, often minor damage can be easily fixed by us sending you a part. Feel free to call us if you are unsure of what to do on (03) 9489 4377.
Installing your Cubby, Shed or Pet House:
Professional Installation:
If you reside within the Melbourne Metro area, in some cases we can provide an installation service. This may depend on our current workload and the distance to your home.
We are unable to provide an installation service on 1.2m or 1.5m elevation kits.
DIY Installation:
All of our products are supplied to you in prefabricated panel kit form, along with all the hardware you need. All you need is a cordless drill and someone to hold the panels in place while you drill. A standard cubby can be easily erected by two adults within 2 hours. Sheds may take more time depending on their size.
Elevation kits of 1.2 and 1.5m are required to be dug and concreted into the ground to a depth of 600mm.
  |
Our cubbies (and sheds) are easy to assemble. Here are the instructions for our most popular cubby, the Huckleberry. This should give you a good idea of the level of simplicity...
The Huckleberry Assembly Instructions
The HuckleberryWhat you will need:
- 1 power-drill, either electric or cordless
- Phillips Head drill tip
- 8m Hex Head drill tip
Hardware included:
- 54 Hex Head Screws – used for:
- Joining walls to walls and to floor sections
- Securing roof
- Fixing posts and pickets
- 12 Phillip Head Screws – used for:
- Attaching the 4 corner trim pieces.
Cubby Sections included:
- Floor:
- Cubby Floor
- Verandah Floor
- Walls:
- 1 back section
- 2 side sections
- 1 front section
- Roof:
- 1 back roof section with timber trim
- 1 front roof section with colorbond capping
- 1 verandah section
- Pickets:
- sets of pickets, side and front
- Posts and Trims:
- 4 verandah posts
- 4 corner trim pieces.
Dimensions:
• 2.4m wide by 1.8m deep (unless Huck 2 which is 2.4m deep) plus 0.7m Verandah
To Construct:
Attach walls to floor:
- Place floor in position – ensure floor is level.
- Stand the back wall (2.4m) and one side wall (1.8m) on the floor ensuring the bottom timber paling overhangs the edge of the floor. The wall frame should sit flush on top of the floor.
- Use the Hex Head screws to attach the walls to each other. Do not screw the walls to the floor. This stage will come later.
- attach approx 10cm from the top and bottom of the frame using the Hex Head Screws
- Follow the last two steps for each of the wall sections.
- Attach all walls to the floor ensuring you screw into the floor bearers where possible (bearers are the beams running underneath the floor).
Attach Roof to walls:
- Place the rear roof section (with timber trim and no capping) onto the rear of the cubby. The timber trim is the bottom edge. Ensure that the angle cut at the top is aligned with the apex of the cubby.
- From inside the cubby use a Hex Head screw to screw up through the side wall frame and into the roof batten.
- Position the front roof section over the top of the rear section, the capping should sit over the top of the rear section. The angle cut of side timber should meet at the apex.
- From inside screw up from frame into battens.
Verandah and Pickets:
- Situate the verandah floor next to front of cubby.
- Hold one picket against the side of the cubby and along the verandah floor. Leave approx 8-10cm clearance up from floor and attach to cubby wall (from inside of picket frame) and screw into the wall frame.
- Butt a verandah post against the picket and attach from the inside of the picket frame.
- The narrow edge of the timber must face forward.
- On a diagonal, screw the verandah post into the verandah floor using the pre-drilled holes.
- Repeat this step for the other side.
- Slide the verandah roof (timber trim is to go to front) under the front roof section – corrugations should align.
- Rest on corner posts.
- Hold verandah roof section firmly from underneath against the front roof section and screw through verandah frame into cubby front wall frame in 4 places.
- Attach front pickets to corner verandah posts.
- Butt centre verandah post against picket and attach.
- Screw verandah posts into floor and into verandah roof frame.
- Attach the four corner trim pieces to the exposed corners of the cubby with Phillips Head screws provided.
Congratulations:
- Now stand back and admire your handy work. Give yourself a pat on the back, you have done a terrific job.
- Take a photo and send to us at
 sales@designashed.com.au This e-mail address is being protected from spambots. You need JavaScript enabled to view it – seriously, we would love to see it as well. We might like to show it on our website, with your permission.
 - Finally – let the kids in, it’s their turn to play.
- We hope that this cubby brings you and your family years of joy.
Thank you from the Design A Shed team.
| |
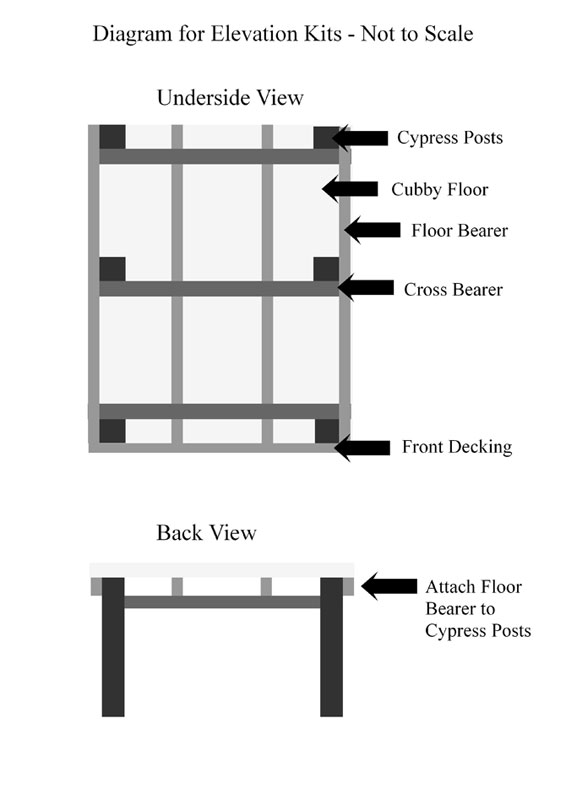
- Place cubby on ground in its correct position. Trace around all four corners.
- Remove floor.
- As the posts are to be positioned on the inside of the outside floor bearers you will need to measure in the following distances.
- Front posts: 20mm in from front and 50mm in from side.
- Side posts: 50mm in from side and in middle of front and back posts.
- Back posts: 50mm in from side and flush with back edge of floor.
- Dig holes for posts (100mm x 100mm x 600mm deep).
- Insert posts, and concrete in. You will need to ensure that the height of the posts are even, this can be done either:
- before you concrete in by adjusting the depth of the hole, or by
- cutting the top of the posts after they have been concreted in.
- Sit floor on top of posts.
- Front posts should be hard up against side floor bearers and front piece of decking.
- Side and rear posts should also be hard against side floor bearers.
- Using the Bugle Batten screws supplied, drill two screws in through the floor bearers into each post.
- Place cross bearers hard up against floor bearers and put two Bugle Batten screws into each post. Bearers sit on back of front posts and on the front of middle and back posts. (see diagram overleaf for position).
- Steps can now be attached to the front decking board.
- Proceed with building the cubby with additional instructions supplied.